Table of Contents
- The Mechanics Behind the Motion: What Happens When You Press That Button
- Is Your Emergency Release Cord Accidentally Pulled? The Most Common (and Easiest) Fix
- That Grinding Noise? Your Opener Just Saved Itself From a Fire
- When the Connection Literally Breaks: Snapped Belts and Chains
- Why Your Smart App Says “Door Open” When It’s Actually Closed (And How to Fix It)
- Key Takeaways
You press the garage door button. You hear the familiar hum of the motor. But the door doesn’t budge. Frustrating, right? If you’re like most homeowners, your garage serves as your primary entrance to your home—in fact, over 70% of Americans use their garage as their main access point. When that access suddenly fails, it’s not just inconvenient; it’s a genuine security and safety concern. Here’s what makes this problem particularly perplexing: your garage door opener sounds like it’s working perfectly. The motor engages, you hear mechanical movement, but the door remains completely stationary. Even more confusing? If you have a smart garage door system, your phone might be telling you the door is open when you’re looking right at it—and it’s clearly closed. Consider this: the average garage door is opened and closed approximately 1,500 times per year. That’s a lot of mechanical stress on components that—despite being engineered for durability—eventually wear down or fail. When they do, understanding what’s happening can save you time, money, and the hassle of an unnecessary service call. In this guide, we’ll walk you through the three most common reasons your garage door opener runs without moving the door—and what you can do about each one. Whether you’re a hands-on DIYer or simply want to understand the problem before calling a professional, you’ll leave with the knowledge to diagnose and potentially fix the issue yourself.
The Mechanics Behind the Motion: What Happens When You Press That Button
Before we dive into troubleshooting, let’s establish a crucial baseline: understanding how your garage door system actually works—and more importantly, what it’s designed not to do. Here’s a misconception that trips up many homeowners: your garage door opener motor doesn’t actually lift your door. Think about it—a residential garage door weighs between 130 and 400 pounds. That’s roughly equivalent to lifting a large refrigerator or two adult humans every single time you press the button. If your opener’s small motor tried to lift that weight directly, it would burn out almost immediately. So what’s really happening? Your door’s torsion springs (those large coiled springs mounted above the door) or extension springs (the stretched springs along the tracks) do the heavy lifting. These springs are under tremendous tension and counterbalance the door’s weight. When properly adjusted, a garage door should feel almost weightless if you lift it manually—you should be able to lift it with one hand. The opener’s role is much more limited: it simply regulates the door’s travel, controlling when it opens, when it stops, and when it closes. It does this through a system of interconnected mechanical components:
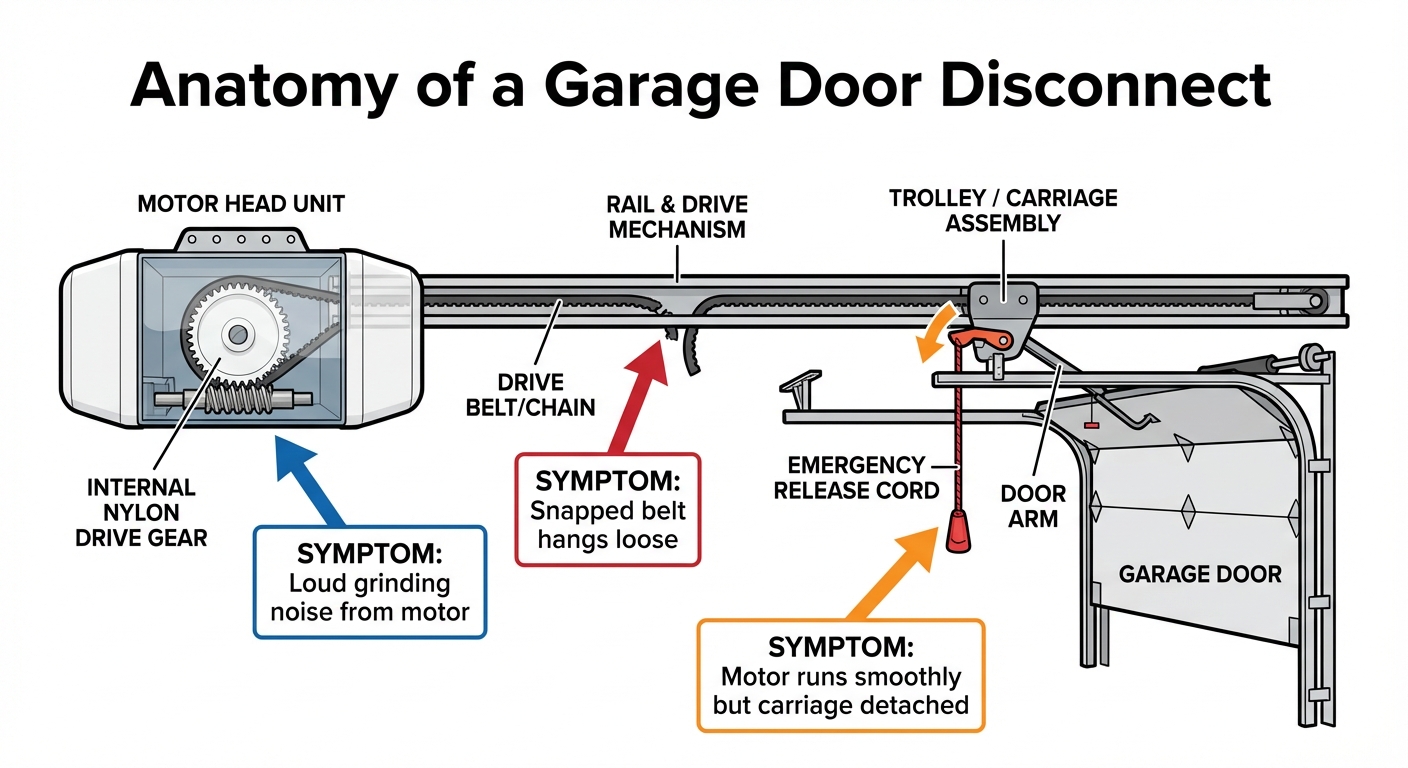
- The Motor Head: Houses the actual motor and drive mechanism (gear assembly)
- The Drive System: A chain, belt, or threaded screw rod that runs along the rail
- The Trolley: Moves along the drive system when the motor engages
- The Carriage: Connects the trolley to the door via a curved arm
When everything works correctly, the motor spins the drive mechanism, which moves the trolley along the rail, which pulls the carriage, which lifts the door. Simple, right? But here’s where intentional engineering comes into play. According to the National Association of Home Builders, a properly maintained garage door opener should last 10 to 15 years. However, many of the components within that system are designed as “sacrificial parts”—components intentionally engineered to fail first when something goes wrong, protecting the motor and preventing more catastrophic failures like electrical fires.
Key Insight: This concept of sacrificial engineering is critical to understanding why your opener might run without moving the door. In most cases, when this symptom occurs, a safety mechanism or intentionally weak component has done exactly what it was designed to do: disconnect before causing serious damage.
Now that you understand the basics, let’s identify which component has likely failed—and why.
Is Your Emergency Release Cord Accidentally Pulled? The Most Common (and Easiest) Fix
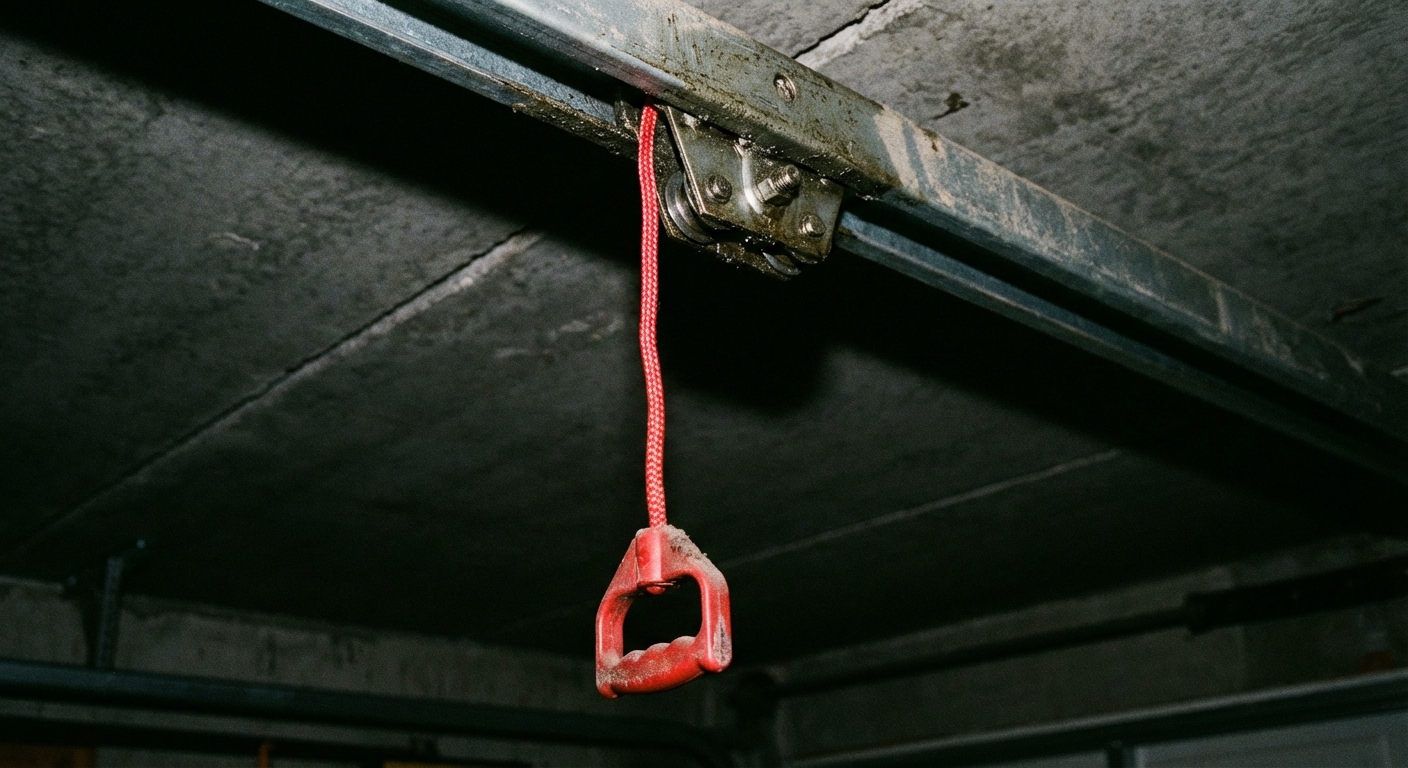
If there’s one culprit behind the “motor runs, door doesn’t move” problem that dominates all others, it’s this one. And the best part? It’s usually the easiest to fix. Look up at your garage door opener. See that red handle hanging from a cord attached to the trolley mechanism? That’s your emergency release cord, and it’s there by federal law. In 1993, the Consumer Product Safety Commission mandated that all automatic garage door openers must include a manual emergency release mechanism. Its purpose is simple but critical: during a power outage or opener failure, you need to be able to manually operate your door. When you pull this red handle, you’re mechanically disconnecting the carriage (which is attached to your door) from the trolley (which is attached to the motor’s drive system). This allows the door to move freely on its tracks without any connection to the motor. It’s an elegant safety feature—but it’s also surprisingly easy to disengage accidentally.
Common Scenarios That Trigger an Accidental Release:
- Your vehicle’s roof rack or cargo carrier catches the cord as you pull into the garage
- Children playing in the garage pull on the “fun red handle”
- You intentionally pulled it during a power outage to leave the garage manually, then forgot to re-engage it when power returned
- A tall item stored on garage shelves falls and snags the cord
Here’s what happens: When the release is disengaged, pressing your wall button or remote makes the motor run normally. The trolley moves along the rail. The chain or belt travels just as it should. But because the carriage is no longer connected to the trolley, the door stays perfectly still. You hear all the right sounds, see all the expected motion—but nothing happens to the actual door. From a homeowner’s perspective, it can feel like a catastrophic failure. But the fix is remarkably simple:
How to Re-Engage the Emergency Release:
- Locate the red handle hanging from your trolley (it’s usually about 6 feet from the floor when the door is closed)
- Pull the cord toward the motor (horizontally, not downward) to position the carriage and trolley for re-engagement
- Press your wall button or remote to activate the opener
- Listen for the click as the trolley catches the carriage and locks back into place
- Test the door by opening and closing it fully to ensure normal operation has resumed
💡 Expert Tip: “This is hands-down the most frequent service call we get—and it’s the one homeowners can usually fix themselves in under 60 seconds,” notes a Smart Doors LLC lead technician. “We’re always happy to help, but we’d rather save our customers the service call fee when it’s something this straightforward.”
One Important Caveat:
If your door was already malfunctioning before the release was pulled, re-engaging it won’t solve the underlying problem. If the trolley repeatedly disengages on its own during normal operation, or if you hear grinding noises when you try to re-engage, there’s likely a deeper mechanical issue that needs professional attention. Don’t force it—move on to the next diagnostic steps.
That Grinding Noise? Your Opener Just Saved Itself From a Fire
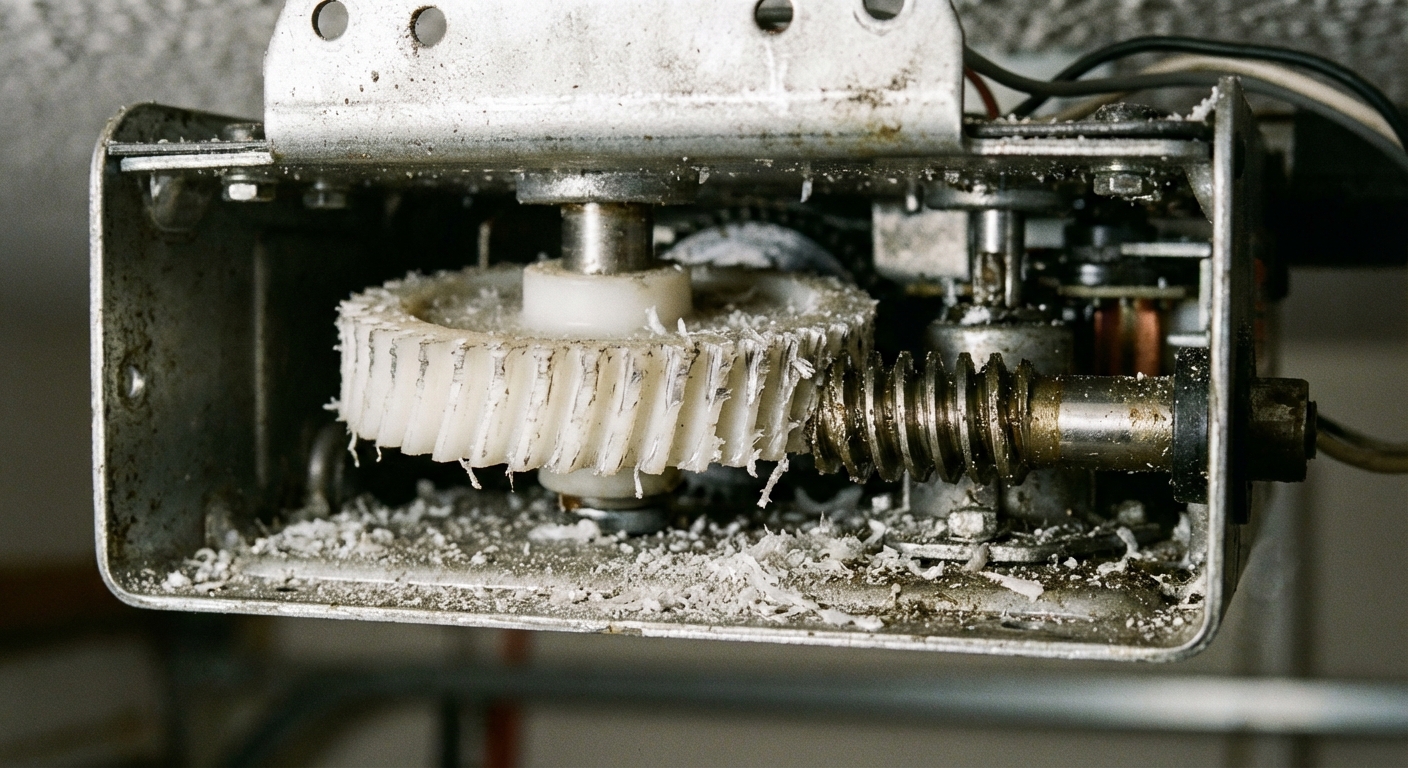
If your garage door opener is producing a loud grinding, buzzing, or humming sound—but neither the door nor the chain/belt is moving—you’re likely experiencing a stripped drive gear. And while this sounds alarming, it’s actually a sign that your opener just protected itself from something much worse. Inside your opener’s motor head sits a gear assembly that translates the motor’s rotational power into the linear motion that moves your trolley. At the heart of this assembly is a large gear wheel, and here’s the fascinating part: it’s made of white nylon plastic, not steel. This isn’t a cost-cutting measure or a design flaw. It’s intentional engineering brilliance. When unexpected resistance occurs in your garage door system—say, a torsion spring suddenly snaps or your door freezes to the concrete floor overnight—the motor tries to power through it. If every component were made of steel, the motor would continue straining against this immovable object, overheating rapidly. In worst-case scenarios, this can lead to electrical fires. Instead, the engineers designed the nylon drive gear as a sacrificial component. When the system encounters abnormal resistance, the softer nylon gear strips its teeth before the motor can overheat. The metal worm gear attached to the motor then spins freely against the now-smooth nylon gear, producing that distinctive grinding sound you’re hearing.
What Causes the Gear to Strip?
The most common trigger is a broken torsion spring. Remember when we discussed how springs do the actual lifting? When a spring breaks—often in the middle of the night with a sound like a gunshot—the door suddenly becomes a 200-400 pound dead weight. The next time someone presses the button, the opener tries to lift this massive load, and the drive gear immediately sacrifices itself to protect the motor.
Other Common Causes Include:
- Frozen doors in cold climates where moisture causes the door to ice-bond to the concrete floor
- Physical obstructions blocking the door’s path (ice buildup in tracks, objects wedged under the door)
- Severely worn door rollers creating excessive friction
- Manually forced operation when someone attempts to “help” the opener by pushing or pulling the door
Real-World Case Study:
A homeowner in Minnesota called us in late January complaining that their garage door opener had suddenly started making a horrible grinding noise. They’d been repeatedly pressing the button trying to force it to work. Upon inspection, we discovered the torsion spring had snapped the previous night during a temperature drop to -15°F. The homeowner hadn’t noticed because they’d parked outside that evening.
Each time they pressed the button the next morning, the system attempted to lift 300 pounds of unsupported door weight. After about five attempts, the drive gear finally stripped. The homeowner was frustrated about the gear failure, but we explained that the $40 replacement gear had just saved them from a $300 motor replacement—or worse, a garage fire.
The critical lesson: Never replace a stripped gear without diagnosing why it stripped. If you simply install a new gear without fixing a broken spring, the new gear will strip immediately—possibly in seconds.
Diagnosing the Root Cause:
Before replacing the drive gear, manually test your door balance:
- Disengage the emergency release (yes, we know—we just taught you how to re-engage it!)
- Lift the door manually to about chest height
- Release the door gently
A properly balanced door should stay in place or move very slowly. If it crashes down, your springs are broken or severely worn. If it flies upward, your springs are over-tensioned. Either condition will cause immediate re-failure of a new drive gear.
Can You Replace the Gear Yourself?
Technically, yes—if you’re mechanically inclined and have experience disassembling small machinery. Replacement gears are widely available and typically cost $15-45. However, the process requires completely disassembling the motor head, removing the old gear, cleaning the worm gear, properly lubricating the new gear, and reassembling everything in precise order. At Smart Doors LLC, we typically recommend professional replacement for two reasons: first, most homeowners lack the specialized tools required for safe motor head disassembly. Second, and more importantly, a professional inspection during this repair can identify the root cause and prevent repeat failures.
💰 Cost Context: A professional drive gear replacement typically runs $150-250, including diagnosis. If spring replacement is also needed, expect $200-400 for that repair. While these aren’t trivial expenses, they’re far less than the $400-600 cost of complete opener replacement—or the thousands in damage from an electrical fire.
If you’re hearing that grinding noise, don’t ignore it. The gear has already failed; continuing to run the opener won’t make it work, but it can damage the motor’s worm gear, turning a simple gear replacement into a full motor replacement.
When the Connection Literally Breaks: Snapped Belts and Chains
Less common than the first two issues, but just as completely disabling, is a failure of the drive mechanism itself—the belt, chain, or screw drive that physically moves your trolley along the rail. Modern garage door openers use one of three drive types, each with its own material characteristics, failure modes, and expected lifespan. Understanding which type you have helps predict how it might fail.
Belt Drive Systems
Belt drives use a flexible polyurethane belt reinforced with steel cords or fiberglass strands. Despite their reputation for quiet operation and durability, belts can fail due to:
- Temperature extremes: Repeated cycling between hot summers (140°F+ in an attic-style garage) and freezing winters causes polymer degradation
- UV exposure: If your garage has windows and the belt receives direct sunlight, UV radiation breaks down the molecular structure
- Age-related brittleness: Even without abuse, polyurethane naturally hardens over time
When a belt fails, it typically does so suddenly and quietly. One moment it’s working fine; the next, you press the button and hear only the motor spinning freely. Visual inspection reveals a cleanly snapped belt hanging loosely from both ends of the rail.
Chain Drive Systems
Chain drives are the workhorses of the garage door world—louder, but incredibly durable. The articulated steel chain can withstand far more abuse than a belt, but it has its own vulnerabilities:
- Broken master link: The connecting link that forms the chain into a continuous loop can fail due to metal fatigue, especially if the chain was previously over-tensioned
- Sheared top sprocket: The metal gear wheel that the chain loops around can strip its teeth or even shear off entirely
- Stretched chain: Over many years, constant cycling causes the chain to elongate, requiring re-tensioning
Chain drive failures are rarely subtle—you’ll typically hear loud clanking, rattling, or grinding sounds before complete failure. When the master link breaks, the chain often falls partially or completely off the sprocket, creating an obvious visual indication of failure.
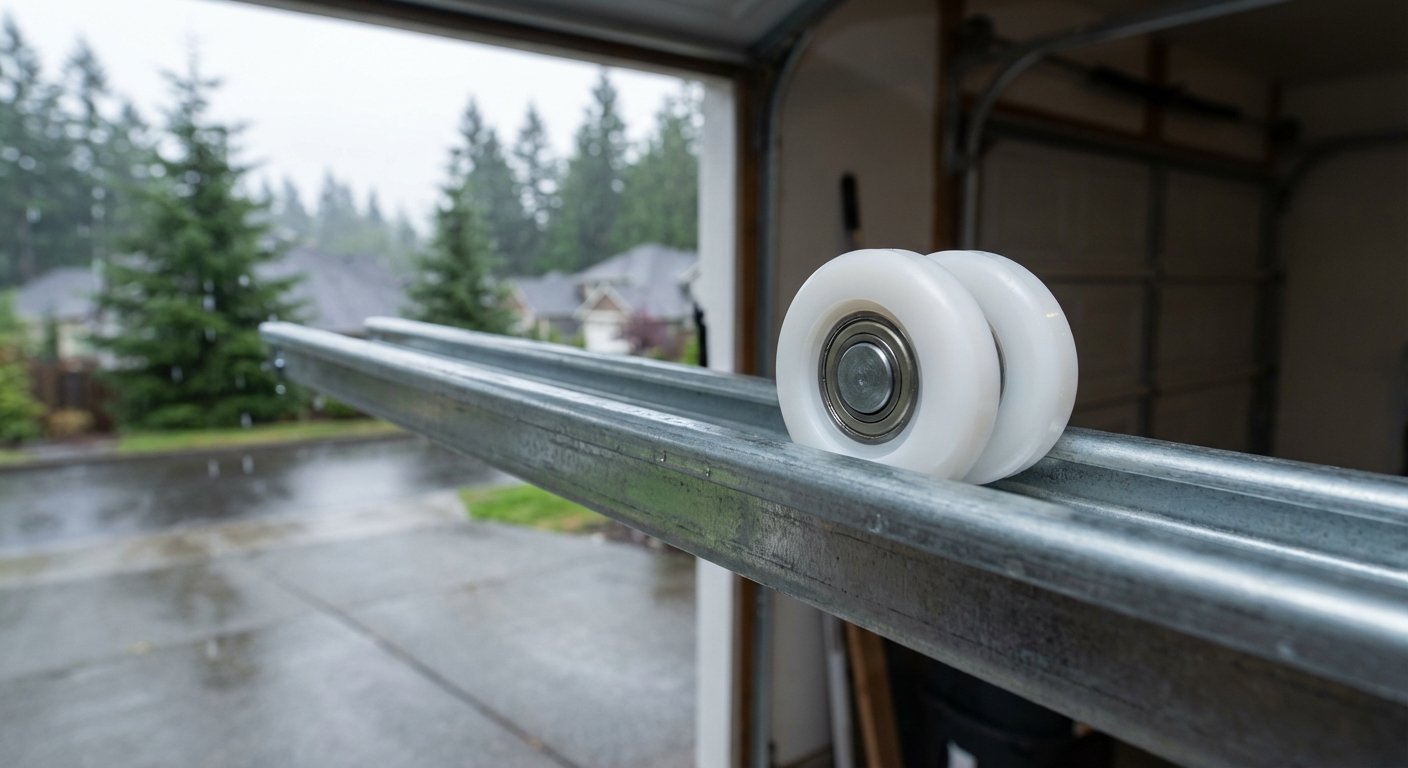
Screw Drive Systems
Screw drives use a solid threaded steel rod rather than a chain or belt. The trolley contains a plastic or metal drive nut that travels along the rod’s threads. These systems rarely experience complete rod failure, but the drive nut itself can strip its internal threads (similar to the gear stripping issue we discussed earlier).
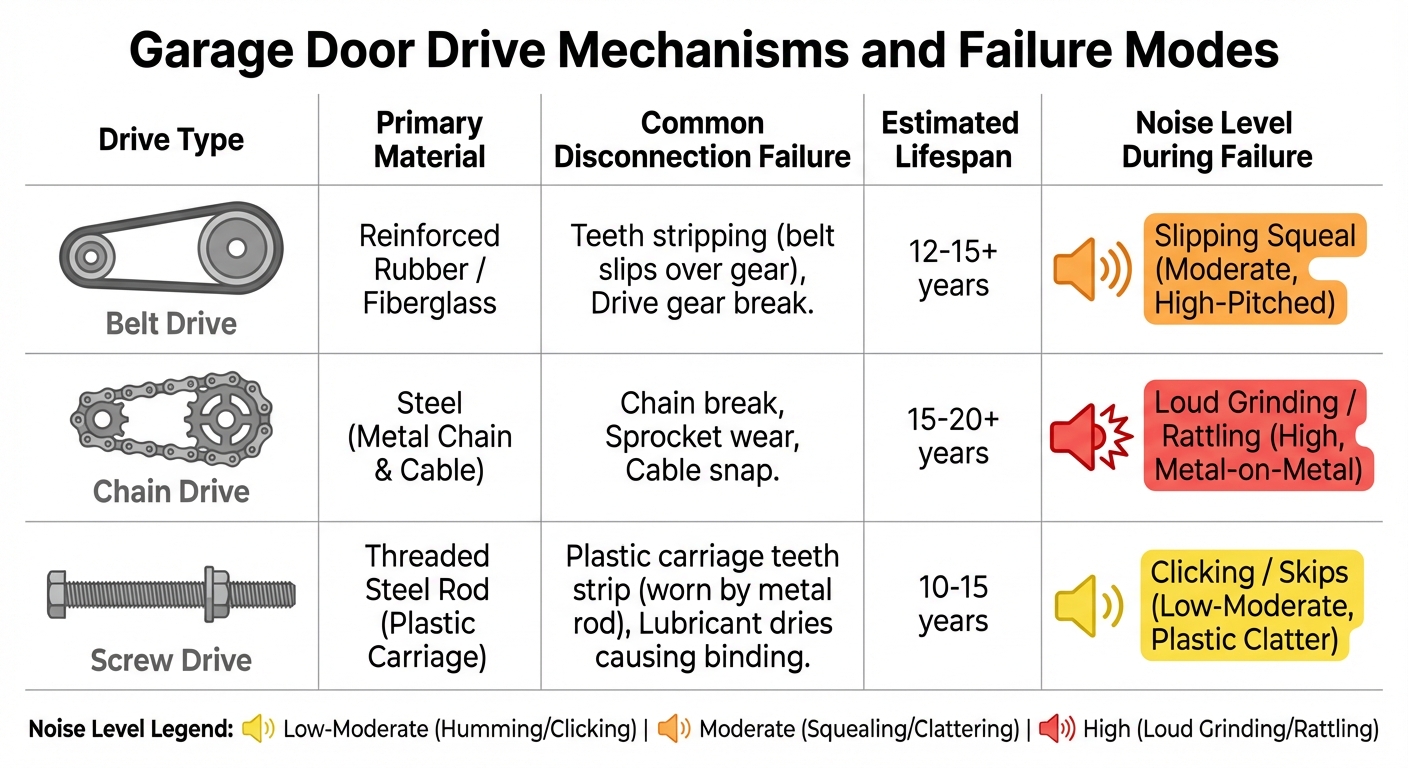
Which System Lasts Longest?
According to industry maintenance guides, chain drives typically edge out belts in longevity, often reaching 15-20 years compared to belts’ 10-15 years. However, this assumes proper maintenance—specifically regular lubrication for chains and periodic tension adjustment for both types.
Can You Replace These Components Yourself?
Belt replacement is technically possible for experienced DIYers but requires complete disassembly of the motor head, similar to gear replacement. Proper tension adjustment is critical; too loose and the belt will skip, too tight and it will snap prematurely or damage bearings. Chain replacement is more accessible to handy homeowners since most systems allow chain access without motor disassembly. However, proper master link installation and tension adjustment require specific knowledge to prevent rapid re-failure.
🔧 The Professional Advantage: When Smart Doors LLC replaces a belt or chain, we simultaneously inspect all related components—the sprocket teeth, drive pulley bearings, trolley wheels, and rail alignment. Often, we discover secondary wear that, if left unaddressed, would cause premature failure of the new drive component. This holistic approach typically adds less than 10% to the repair cost but can prevent a repeat failure six months later.
Cost Considerations:
Belt replacement typically runs $150-300 professionally, while chain replacement falls into the $125-250 range. If the motor’s top sprocket is also damaged, add another $50-100. While these aren’t insignificant expenses, they’re far less than the $400-800 cost of complete opener replacement.
Prevention Tip: If you have a belt drive system, consider installing a UV-blocking window film on any garage windows that allow direct sunlight onto the belt. For chain drives, apply a spray-on PTFE chain lubricant quarterly (not WD-40, which is a solvent, not a lubricant). These simple maintenance steps can extend your drive mechanism’s lifespan by years.
Why Your Smart App Says “Door Open” When It’s Actually Closed (And How to Fix It)
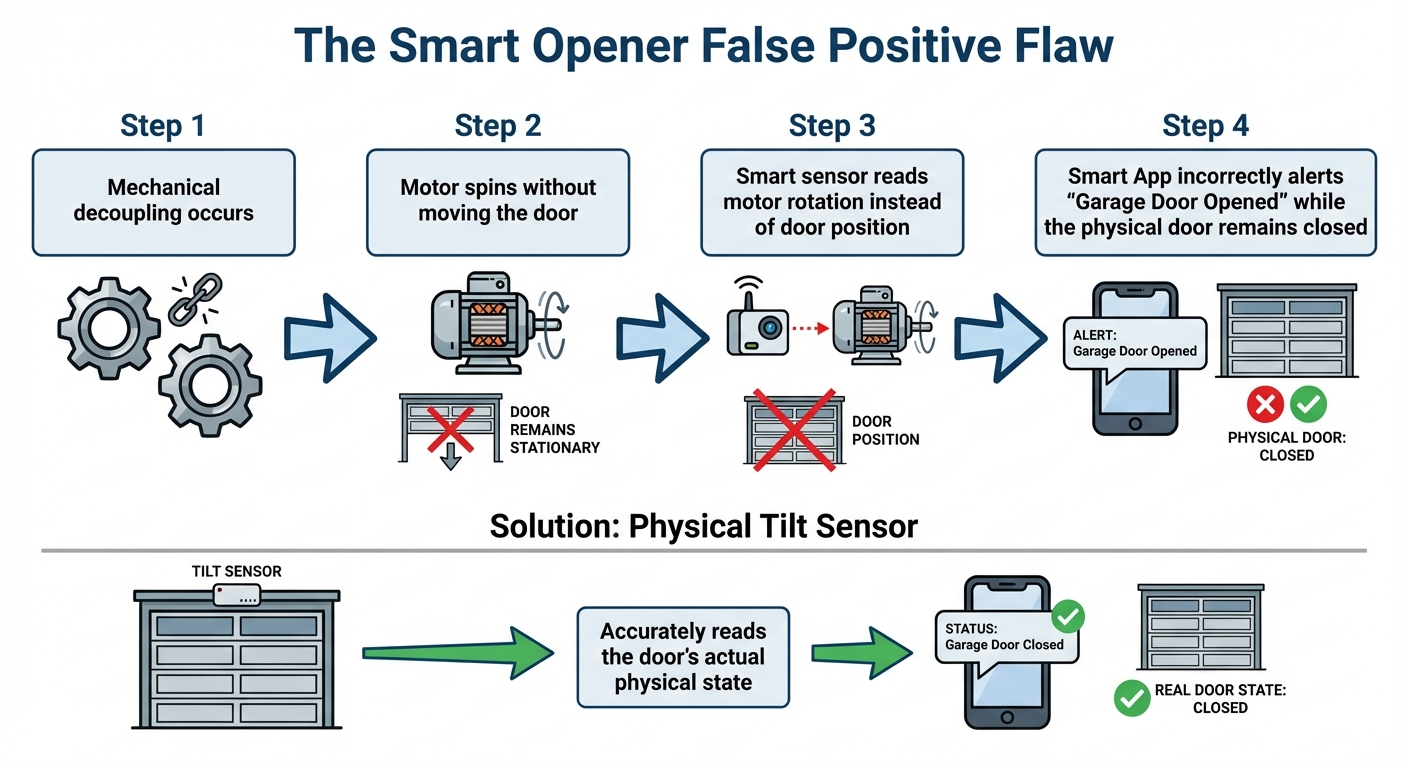
You’re at work. Your smartphone vibrates with a notification: “Garage Door Opened.” Panic sets in—did you forget to close it? Did someone break in? You frantically open the app, heart racing, only to check your security camera and see the door sitting firmly closed on the ground. Welcome to one of the most frustrating complications of modern smart garage door systems: false positives created by mechanical failures. Most smart garage door systems—including popular platforms like Chamberlain’s myQ, Liftmaster’s Security+, and various third-party smart controllers—determine door position by monitoring the motor’s rotation, not the door’s actual physical movement. This works flawlessly under normal operating conditions, but creates significant problems when any of the mechanical disconnections we’ve discussed occur.
Here’s the Technical Problem:
When you press the button, the system sends power to the motor. The motor begins spinning. Internal sensors detect this rotation and transmit a signal: “Motor running → Door must be moving.” After calculating the expected time for full travel, the system updates its status to “Open” or “Closed” based purely on motor runtime—even if the door never budged an inch.
Real-World Scenarios Where This Causes Problems:
Scenario 1 – The Disengaged Release:
Someone pulls the emergency release cord to leave the garage during a power outage. Later, when power returns, another family member presses the wall button. The motor runs freely, the trolley travels the entire length of the rail, and the smart system reports “Garage Door Opened.” Meanwhile, the door remains locked in the closed position. Security implication: The homeowner receives a “Door Opened” notification and assumes the door successfully opened for a family member’s arrival. Hours later, they realize the door has been closed the entire time—but their security system was never armed because they believed the garage was open.
Scenario 2 – The Stripped Gear:
A torsion spring breaks overnight. The next morning, you press the button before noticing the broken spring. The motor grinds for several seconds before you release the button. Your smart system registers motor activity and, depending on how it’s programmed, may report “Door Open” (detecting motor rotation) or get stuck in “Opening…” status indefinitely. Security implication: You leave for work believing the door failed to close properly. You spend the day worried about security, possibly even asking a neighbor to check on your home, when in reality the door never moved at all.
Scenario 3 – The Commercial Case Study:
A commercial facility using residential-style smart openers experienced this exact scenario. After a power outage, an employee manually disengaged the trolley to move equipment. Later, the facility manager checked the smart app remotely—it showed “Closed” (which was technically correct). That evening, an employee pressed the button while the trolley was still disengaged. The motor ran, the app updated to “Open,” and the manager remotely “closed” it from his phone. The motor ran again in reverse, and the app confirmed “Closed.” But the door had never moved. It remained physically closed and locked the entire time. The next morning, another employee couldn’t figure out why pressing the button caused the motor to run but produced no result—because the system had no idea the trolley was disengaged.
The Solution: Physical Tilt Sensors
The most reliable smart garage door systems use door-mounted tilt sensors—small devices attached directly to the door panel that detect the actual physical angle of the door regardless of motor or trolley status. These accelerometer-based sensors know whether the door is horizontal (closed), vertical (open), or anywhere in between. When a tilt sensor is present, the system reports door status based on actual door position, not motor behavior. If the motor runs but the door doesn’t move, the tilt sensor continues reporting “Closed” status—providing accurate information and alerting you to a mechanical problem.
Smart Doors LLC Recommendation:
When we install smart garage door systems, we always advocate for dual verification—motor sensors and physical tilt sensors. The combination provides several benefits:
- Accurate status reporting regardless of mechanical failures
- True obstruction detection (the door stopped mid-travel because something blocked it, not because the trolley disengaged)
- Battery backup awareness (tilt sensors typically run on batteries and alert you when power is low)
- Integration reliability (many home automation systems work more reliably with physical sensors than motor-based detection)
Retrofitting Existing Systems:
If you already have a motor-only smart system, aftermarket tilt sensors are widely available and typically cost $25-50. Most are wireless and can be self-installed in under 15 minutes. Simply mount the sensor to the top panel of your door, pair it with your smart system according to manufacturer instructions, and you’ve significantly improved your system’s accuracy. Popular compatible tilt sensors include the Ecolink Z-Wave Tilt Sensor (for Z-Wave systems) and the Chamberlain MyQ Door Sensor (for myQ-specific systems). Check your smart system’s documentation for compatible sensor recommendations. The bottom line: If you have a smart garage door opener, don’t rely solely on motor-based position detection. The small investment in a physical tilt sensor can save you from false alarms, security vulnerabilities, and the unnecessary stress of wondering whether your garage door is actually in the position your phone says it is.
Key Takeaways
When your garage door opener runs but the door refuses to move, it’s rarely a catastrophic failure—it’s usually a mechanical disconnect doing exactly what it was designed to do. Check the emergency release first. This simple red-handled cord is, by far, the most common culprit. A 60-second check could save you a service call and immediately restore function. Simply pull the cord toward the motor while running the opener to re-engage. That grinding noise is protective, not destructive. If you hear grinding but see no movement from the belt or chain, your nylon drive gear has stripped to protect your motor from overheating. Before replacing it, determine why it failed—usually a broken torsion spring. Fixing only the symptom without addressing the cause guarantees immediate re-failure. Drive mechanism failures are obvious. A snapped belt or broken chain creates distinctive symptoms—belts fail quietly with zero motion, chains fail loudly with clanking and rattling. Both require professional replacement in most cases, but they’re protecting your home from the alternative: a door that fails mid-cycle and crashes down. Smart systems need physical verification. If you’ve integrated your garage door with a smart home system, motor-only sensors can create false positives when mechanical disconnections occur. Invest in a door-mounted tilt sensor for accurate position reporting regardless of motor status—your security and peace of mind are worth the $30-50 upgrade. Most importantly: Know when to call a professional. While checking the emergency release cord is DIY-friendly, repairs involving springs, gears, or drive mechanisms carry real risks. Torsion springs are under hundreds of pounds of tension and can cause serious injury if mishandled. Stripped gears often indicate underlying problems that require diagnostic expertise. Your garage door opener is a sophisticated piece of engineering, built with intentional fail-safes to protect your home and your family. When it sounds like it’s working but nothing moves, it’s usually doing exactly what it was designed to do—protect the motor and alert you to a bigger issue.
Ready to Get Your Garage Door Working Again?
Not sure what’s causing your specific problem? The team at Smart Doors LLC offers comprehensive diagnostics and same-day repairs throughout Southwest Washington. We’ll identify whether it’s a simple emergency release issue or something requiring professional attention—and we’ll never recommend repairs you don’t actually need.
References:
- DASMA. (2022). Garage Doors as the Primary Entrance: Consumer Usage Statistics. Door & Access Systems Manufacturers Association. https://www.dasma.com/usage-statistics
- Door & Access Systems Manufacturers Association (DASMA). (2023). Residential Garage Door Spring Life and Cycle Expectancies. https://www.dasma.com/dasma-technical-data-sheets/
- National Association of Home Builders (NAHB). (2021). Study of Life Expectancy of Home Components. https://www.nahb.org/-/media/NAHB/advocacy/docs/industry-issues/sustainability/nahb-life-expectancy-of-home-components.pdf
- This Old House. (2023). How to Fix a Garage Door That Won’t Open. https://www.thisoldhouse.com/garages/21019015/how-to-fix-a-garage-door-that-won-t-open
- LiftMaster/Chamberlain Group. (2024). myQ Smart Access Functionality and Troubleshooting Tips. https://support.chamberlaingroup.com/s/article/How-myQ-knows-if-the-door-is-open-or-closed
- U.S. Consumer Product Safety Commission (CPSC). (1993). Safety Standard for Automatic Residential Garage Door Operators. https://www.cpsc.gov/Regulations-Laws–Standards/Statutes/Automatic-Garage-Door-Opener-Safety
- Bob Vila. (2023). Garage Door Opener Repair: Why It Sounds Like It’s Working But Isn’t. https://www.bobvila.com/articles/garage-door-wont-open/
- Family Handyman. (2022). Garage Door Maintenance: Chain vs. Belt Drives. https://www.familyhandyman.com/article/belt-vs-chain-garage-door-opener/
- HomeAdvisor / Angi. (2023). Common Garage Door Opener Problems and Cost to Repair. https://www.angi.com/articles/common-garage-door-problems.htm