Table of Contents
- The Life-Saving Technology Behind Your Garage Door’s “Stubborn” Behavior
- Inside the Infrared Beam: The Technology That Stops Your Garage Door
- Smart Doors’ Step-by-Step Guide: Troubleshooting Reversing Sensors at Home
- Red Flags That Require Professional Garage Door Repair
- Smart Doors in Action: Solving “Impossible” Sensor Problems
- Smart Doors’ Maintenance Checklist: Prevent Sensor Problems Before They Start
- Final Thoughts
You press the button, the garage door starts closing, and then—without warning—it reverses back up. You try again. Same result. Frustrating? Absolutely. But before you assume your garage door is broken, here’s the truth: this “malfunction” is actually a critical safety feature performing exactly as designed. What you’re experiencing is your photoelectric reversing sensors (commonly called photo eyes) doing their job to protect your family from entrapment injuries. Since these sensors became mandatory in 1993, garage door entrapment fatalities have dropped by over 85%. That reversing door isn’t broken—it’s saving lives. This guide will walk you through the science behind these sensors, help you troubleshoot common issues yourself, and clearly identify when it’s time to call Smart Doors for professional help. Unlike surface-level troubleshooting lists, this guide explains why sensors fail and how environmental factors like sunlight and moisture interfere with the infrared beam. Let’s turn your frustration into understanding—and get that garage door working properly again.
The Life-Saving Technology Behind Your Garage Door’s “Stubborn” Behavior
Understanding why your garage door has reversing sensors transforms frustration into appreciation. This isn’t just another annoying piece of technology—it’s a federally mandated safety system with a profound history.
Pre-1993 Garage Door Dangers
Before 1993, garage doors relied on mechanical pressure sensors that required physical contact to trigger reversals. A child or pet had to actually be struck by the descending door before the system would react. The tragic results were predictable: serious injuries and deaths, particularly among children who couldn’t escape quickly enough. These early mechanical systems had another fatal flaw—they were prone to miscalibration. Homeowners would adjust the force settings themselves, often increasing the closing pressure to overcome sticky tracks or misaligned doors. This “fix” effectively disabled the safety feature, turning a 300-pound garage door into an unforgiving hazard.
The 1993 Federal Mandate That Changed Everything
In response to mounting safety concerns, the U.S. Consumer Product Safety Commission implemented the Consumer Product Safety Improvement Act, establishing the UL 325 standard. By 1993, federal law (16 CFR Part 1211) required all residential garage door operators manufactured for sale in the United States to include an external entrapment protection device—most commonly, non-contact photoelectric sensors. This wasn’t a suggestion or industry best practice. It was federal law. Manufacturers had to shift from contact-based systems to infrared beam technology—a move that fundamentally changed how garage doors operate.
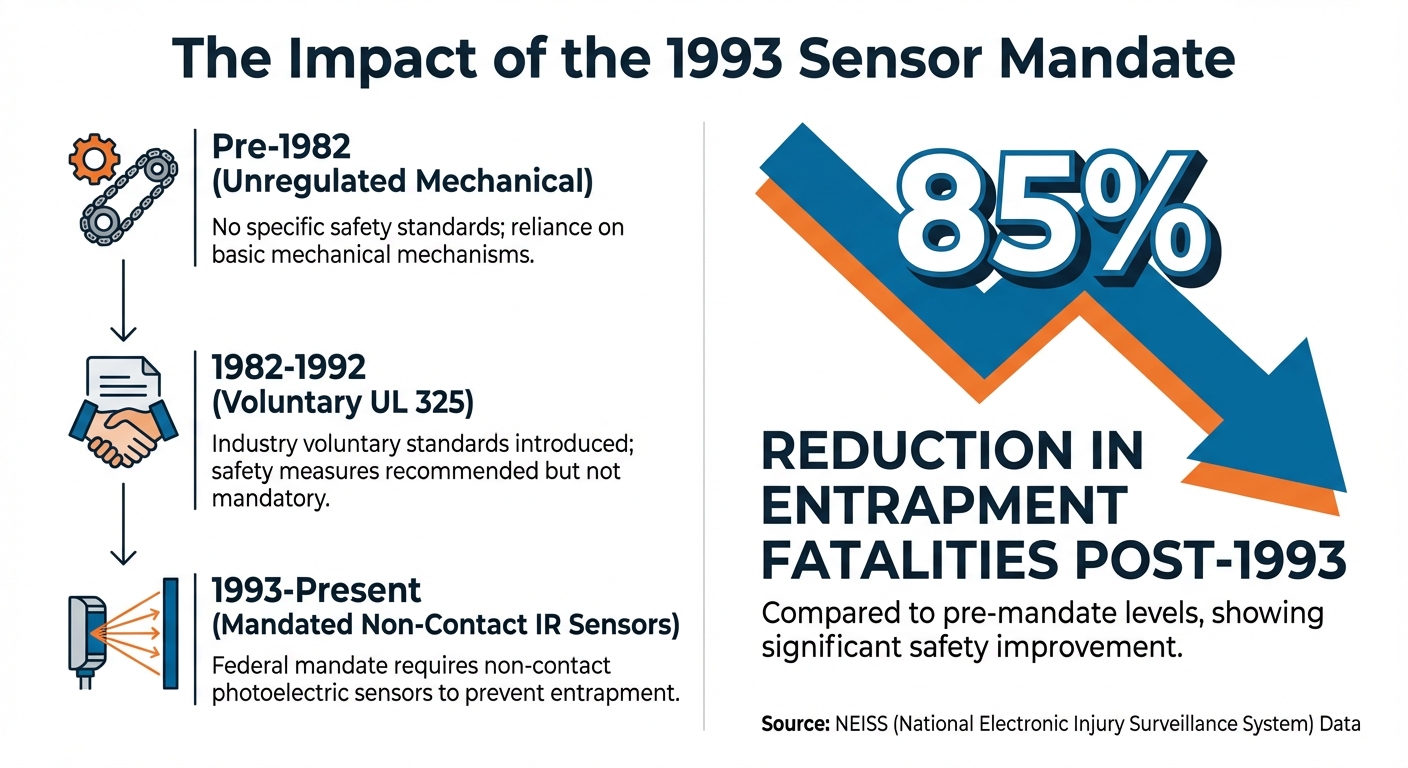
The Numbers Don’t Lie
According to National Electronic Injury Surveillance System (NEISS) data, the implementation of mandatory photoelectric sensors reduced garage door entrapment fatalities by over 85% in the decade following the 1993 mandate. Thousands of injuries were prevented, countless lives saved—all because of those two small sensors mounted on either side of your garage door opening. Understanding this history helps you see that when your door reverses, it’s not “broken”—it’s protecting you. But that doesn’t mean you’re stuck with constant reversals. Let’s explore how these sensors actually work so you can troubleshoot them effectively.
Inside the Infrared Beam: The Technology That Stops Your Garage Door
To fix your reversing garage door, you need to understand the elegant—yet vulnerable—technology protecting your family.
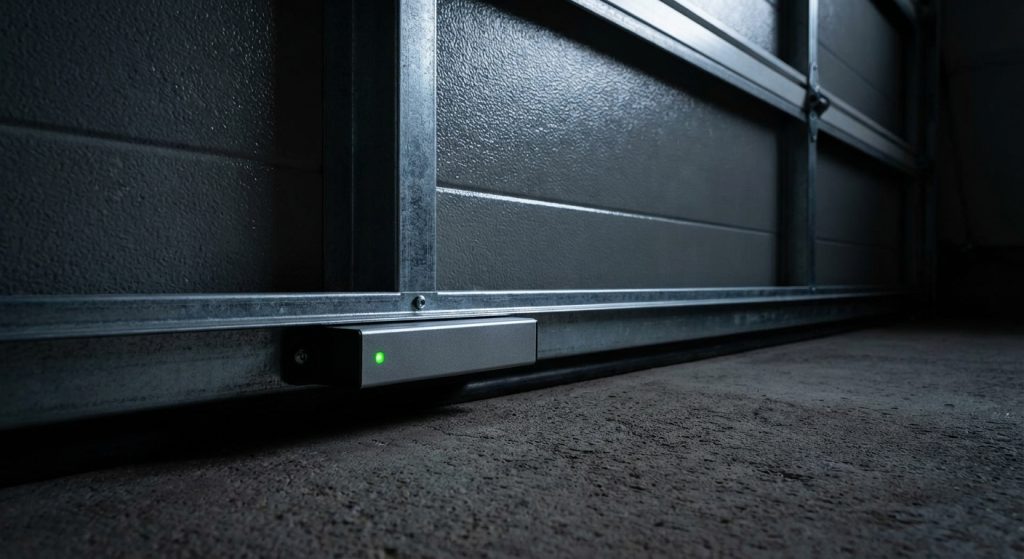
The Two-Unit System
Your garage door safety system consists of two distinct units mounted approximately 6 inches above the floor on opposite sides of the door opening: Emitter (Transmitter): This unit projects a continuous, invisible infrared beam at wavelengths between 850 and 940 nanometers across the garage door opening. You can’t see this beam with your naked eye, but it’s there, working 24/7. Receiver: On the opposite side sits the receiver, which houses a photodiode specifically tuned to detect that precise IR frequency. Think of it as a highly specialized eye that can only “see” one specific color of invisible light.
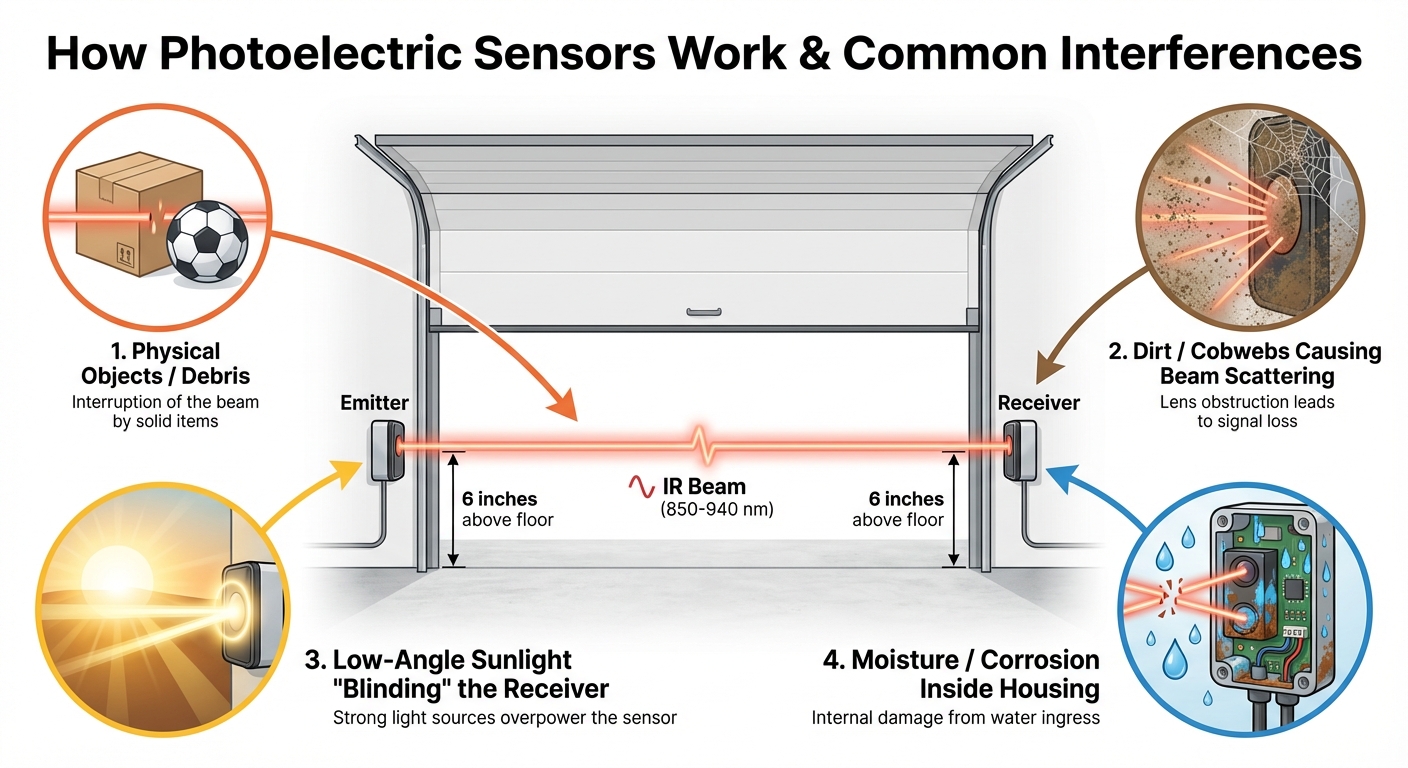
How Detection Works
When the receiver continuously detects the emitter’s beam, the logic board in your garage door opener allows the door to close. The moment that beam is broken—by a person, pet, or object—the system immediately halts the door’s downward progress and reverses it to the fully open position. This happens in milliseconds. The response time is so fast that even a small child walking into the doorway triggers an immediate reversal before any contact occurs.
Why This System is Vulnerable
The brilliance of this non-contact safety system is also its weakness. Because it relies on an invisible beam of light traveling through open air, several environmental factors can interfere: Dust and Cobwebs: When particles accumulate on the sensor lens, they scatter the IR beam through a process called diffraction. Even a thin cobweb can weaken the signal below the receiver’s detection threshold, causing the system to think something is blocking the doorway. Sunlight Interference: Here’s where physics gets interesting. Direct, low-angle sunlight—especially at sunrise or sunset—can “blind” the receiver by oversaturating the photodiode with ambient infrared radiation. The sun produces massive amounts of infrared light. When that light hits your receiver, it prevents the photodiode from distinguishing the emitter’s specific frequency from the solar background noise. Moisture and Corrosion: Water from rain, snow, or high humidity can condense inside the lens or corrode the internal circuit board. This disrupts signal transmission in unpredictable ways—sometimes the sensor works, sometimes it doesn’t, depending on temperature and humidity levels.
Diagnostic Indicators
Most sensors feature LED indicator lights that provide real-time diagnostic information:
- Solid green or amber LED = proper alignment and clear beam path
- Flickering or off LED = misalignment, obstruction, or electrical problem
These lights are your first diagnostic tool. Learn to read them, and you’ll solve most sensor issues before calling a professional. Now that you understand the technology and its vulnerabilities, let’s walk through the most common culprits when your garage door keeps reversing—and how to fix them yourself.
Smart Doors’ Step-by-Step Guide: Troubleshooting Reversing Sensors at Home
Most garage door sensor issues can be resolved with basic troubleshooting. Follow this hierarchical protocol to identify and fix common problems before considering professional help.
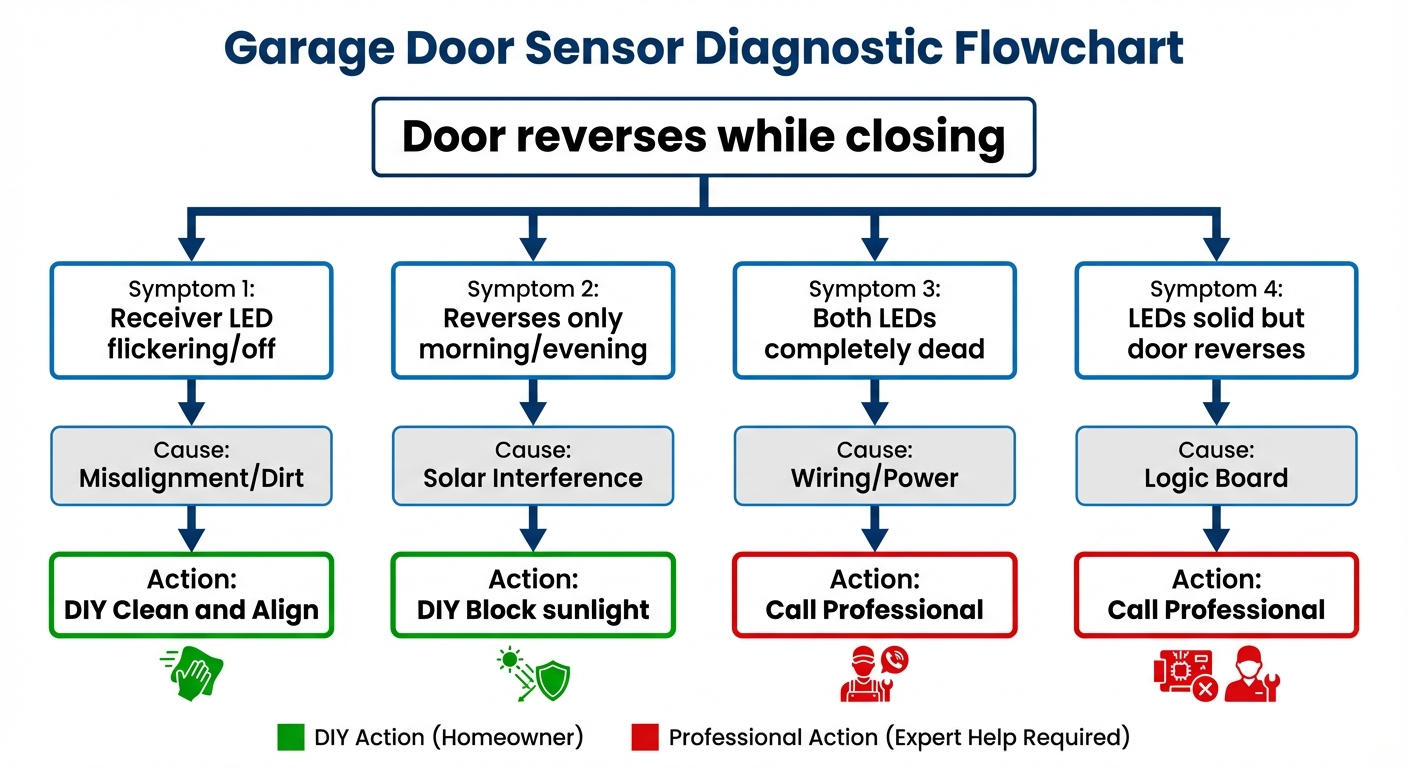
Issue #1: Physical Obstructions in the Sensor Path
Symptoms: Your door reverses immediately upon closing. The receiver LED is flickering or completely off. Cause: Something is physically blocking the invisible infrared beam. Common culprits include yard debris (leaves, twigs), children’s toys, storage bins, sports equipment, or seasonal decorations that have migrated into the sensor pathway. DIY Fix:
- Conduct a visual sweep of the area 6 inches above the garage floor, extending across the entire door opening
- Remove all objects from this critical zone
- Press the garage door button to test—if it now closes completely, problem solved
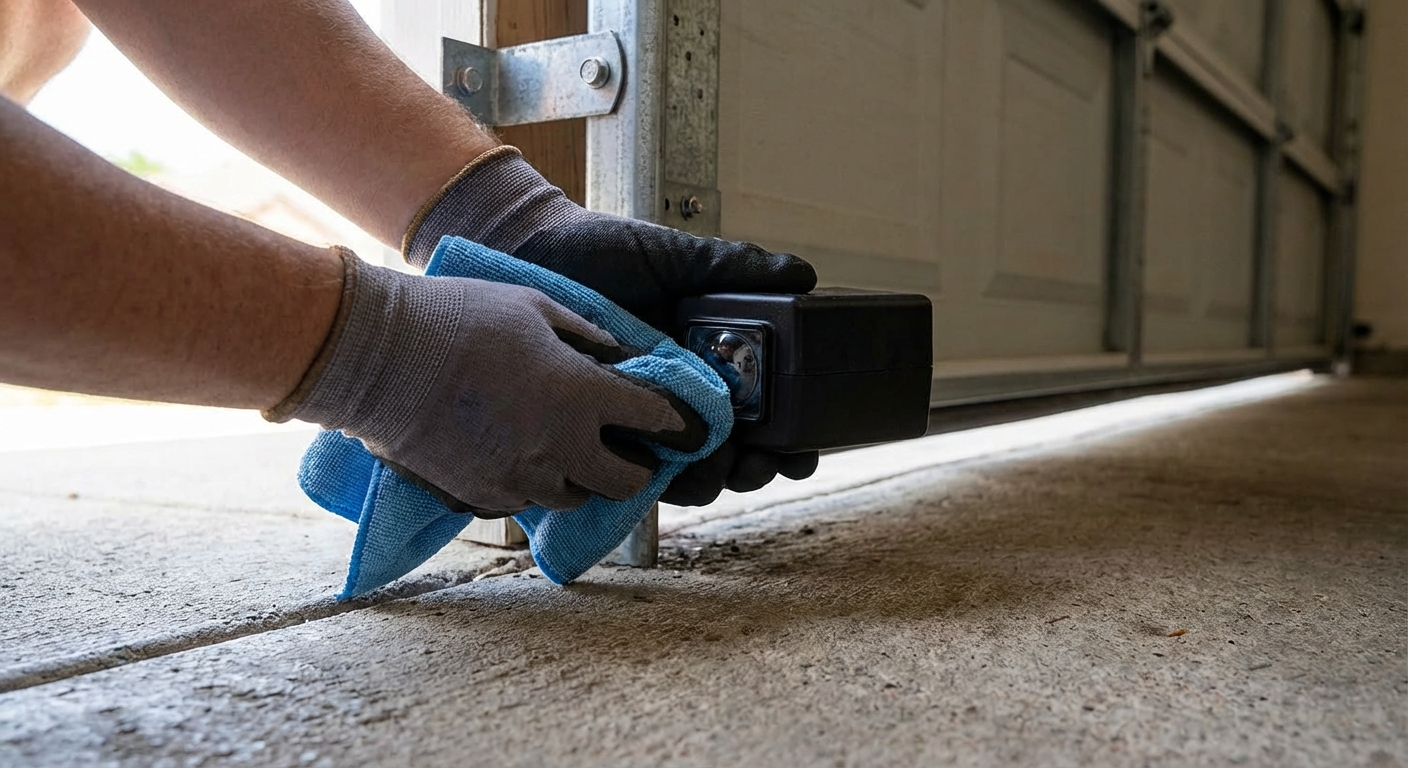
Issue #2: Dirty or Obstructed Lenses
Symptoms: Your door reverses intermittently, especially after windy days, yard work, or dusty conditions. The behavior seems random rather than consistent. Cause: Dust, pollen, cobwebs, or water spots have accumulated on the sensor lens, scattering the IR beam and weakening the signal strength. You might not even see the obstruction with your naked eye—a thin film of dust is enough to cause problems. DIY Fix:
- Use a dry, clean microfiber cloth to gently wipe both the emitter and receiver lenses
- Inspect the lens surface for any remaining film or residue
- If you see condensation inside the lens (visible as internal fog), the sensor may need replacement
Important: Avoid chemical cleaners—they can degrade the plastic housing and leave residue that attracts more dust. Stick with a dry cloth or, if absolutely necessary, lightly dampen the cloth with water only.
Issue #3: Sensor Misalignment
Symptoms: The receiver LED is flickering, blinking, or completely off, while the emitter LED remains solid. The door reverses consistently every time you try to close it. Cause: Vibration from daily door operation, accidental bumps (from cars backing out, lawnmowers, bicycles leaning against the wall), or loose mounting brackets have shifted the sensors out of alignment. Even a quarter-inch misalignment breaks the beam. DIY Fix:
- Check the LED indicators on both sensors:
- Emitter: Should display a solid light (often amber or yellow)
- Receiver: Should display a solid green light when properly aligned
- Gently adjust the receiver bracket left, right, up, or down while watching the LED
- When the LED becomes solid green, stop moving the sensor
- Tighten the mounting bracket screws to lock the sensor in position
Issue #4: Sunlight Interference (“Blinding” the Receiver)
Symptoms: Your door reverses only during specific times of day—typically early morning or late afternoon. The problem is seasonal, worse in summer when the sun’s angle is lower. The sensor LEDs appear normal, and there’s no visible obstruction. Cause: Direct, low-angle sunlight is hitting the receiver, oversaturating the photodiode with ambient infrared radiation. This “blinds” the sensor, preventing it from detecting the emitter’s specific IR frequency against the solar background noise. DIY Fix: Temporary Solution: Create a sunshade to block ambient light from hitting the receiver lens. Options include:
- A toilet paper tube cut to size and taped above the sensor
- A small piece of cardboard bent into an “awning” shape
- Commercial sensor visors (available at hardware stores)
Permanent Solution: Swap the physical positions of the emitter and receiver so the receiver is mounted on the shaded side of the garage opening. This requires no new hardware—just unmount both sensors and reverse their positions.
Red Flags That Require Professional Garage Door Repair
While many sensor issues are DIY-friendly, certain symptoms indicate electrical or mechanical failures that require professional expertise. Attempting to fix these issues yourself can result in electrical shock, further damage to your garage door system, or voiding manufacturer warranties.
Electrical and Wiring Failures
Symptoms: Both sensor LEDs are completely dead—no light at all, even after you’ve cleaned the lenses and checked for obstructions. Or, one LED flickers erratically regardless of alignment adjustments. Cause:
- Frayed or severed wiring from rodent damage (mice and squirrels love to chew on low-voltage wires), accidental staple punctures during home improvement projects, or structural vibration loosening wire connections over years of operation
- Loose wire connections at the overhead opener unit’s terminal block, where sensor wires connect to the logic board
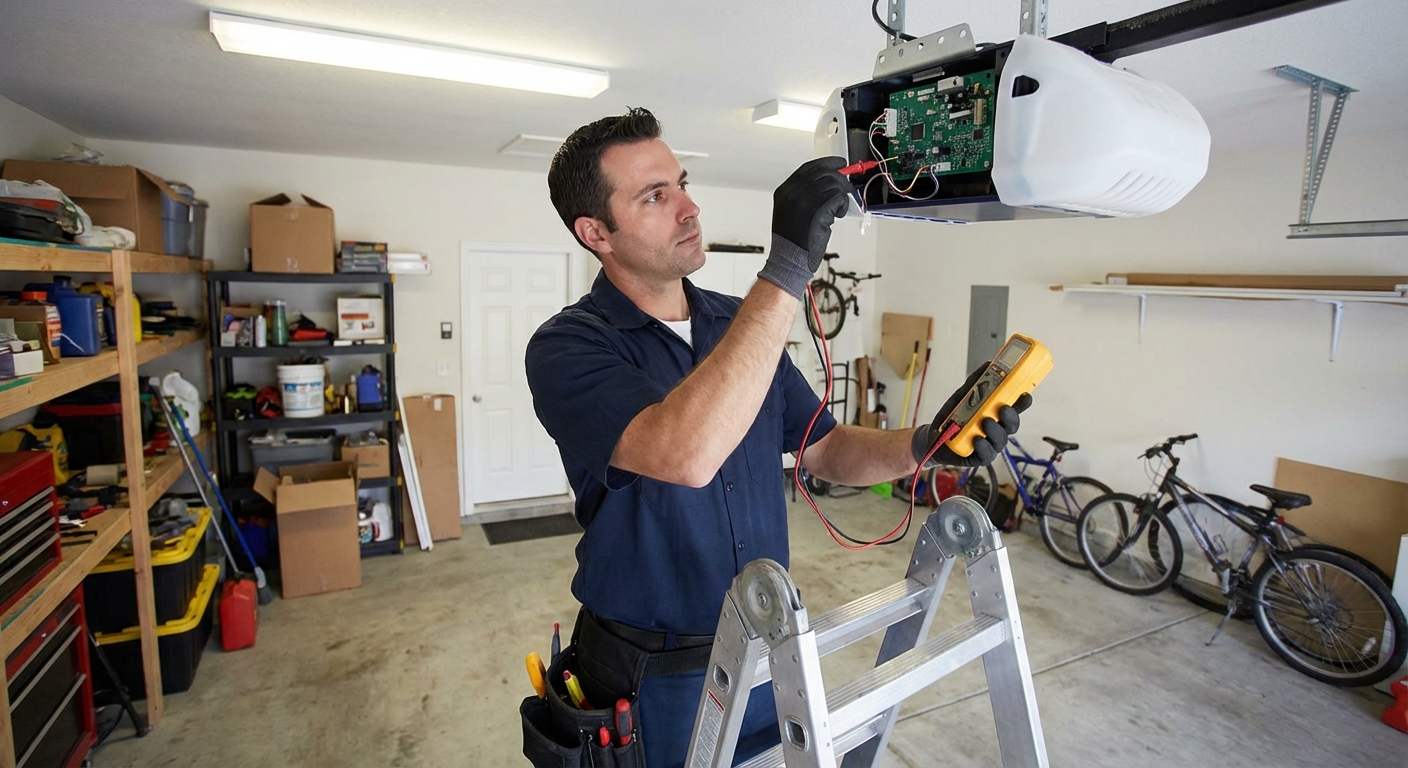
Why It’s Dangerous to DIY: Garage door openers operate on 120V AC power. While the sensor wiring itself is low-voltage (typically 24V), the terminal connections are located inside the overhead unit’s electrical housing. Exposed wires pose a shock hazard, and improper diagnosis can short-circuit the logic board, leading to a $200-$400 replacement cost. Smart Doors Solution: Our certified technicians safely test voltage, trace wiring paths through walls and door frames, and replace damaged cables with proper insulation and code-compliant routing. We also install protective conduit to prevent future rodent damage.
Water Damage and Corrosion
Symptoms: Sensors work intermittently, especially after rain or snow. You notice visible rust on the sensor housing. Condensation appears inside the lens (visible as internal fog that doesn’t wipe away). The metal mounting bracket shows corrosion or deterioration. Cause: Garages prone to flooding, poor drainage, or high humidity allow moisture to penetrate the sensor’s internal circuit board. This causes galvanic corrosion—a chemical reaction between moisture and the electronic components that creates short circuits and component failure. Water can enter through:
- Deteriorated weatherstripping around the garage door
- Cracks in the garage floor allowing groundwater seepage
- Condensation from temperature differentials (cold garage, warm humid air)
- Direct rain exposure in garages with inadequate overhangs
Why It’s Dangerous to DIY: Corroded electronics fail unpredictably. Attempting to dry out or repair circuit boards without proper equipment (desiccant chambers, conformal coating, ultrasonic cleaning) can worsen the damage. Additionally, moisture inside electrical components creates shock hazards. Smart Doors Solution: We install weather-sealed sensor units rated for outdoor exposure, elevate mounting brackets above potential water lines (using case-by-case site assessment), and implement drainage solutions to prevent future moisture intrusion. In severe cases, we relocate sensors to protected positions or install sensor guards.
Logic Board Malfunctions
Symptoms: Your sensors are perfectly aligned with solid LEDs, no obstructions, clean lenses—but the door still reverses every time. Or, the door closes fine for weeks, then suddenly starts reversing with no changes to the sensor setup. Cause: Power surges from lightning strikes, electrical grid fluctuations, or large appliances cycling on the same circuit can fry the garage door opener’s logic board. This small computer processes signals from your sensors, wall button, and remote controls. When damaged, it misinterprets sensor signals or fails to process them at all. Other causes include:
- Age-related capacitor failure (typical lifespan: 10-15 years)
- Manufacturing defects in circuit board components
- Overheating from inadequate ventilation in the opener housing
Why It’s Dangerous to DIY: Logic boards contain sensitive integrated circuits that require multimeter testing, oscilloscope diagnosis, and precise replacement procedures. Installing an incompatible replacement board can damage the new component or create fire hazards from improper voltage regulation. Additionally, many opener manufacturers void warranties if non-certified technicians open the electrical housing. Smart Doors Solution: We diagnose logic board failures using professional-grade diagnostic tools, replace boards with manufacturer-certified components, and install surge protectors to prevent future damage. We also update firmware (if applicable) and verify all safety systems are functioning to current code requirements.
When to Call Smart Doors:
If you’ve tried the DIY troubleshooting steps and your garage door still won’t stay closed, it’s time to call the professionals. Our certified technicians have the tools, training, and experience to diagnose complex electrical and mechanical issues safely.
Contact Smart Doors Today for a free diagnostic inspection. We’ll identify the problem, explain your options, and restore your garage door’s safety and functionality.
Smart Doors in Action: Solving “Impossible” Sensor Problems
Real-world diagnostic experience reveals that some sensor problems defy simple explanations. These case studies demonstrate Smart Doors’ diagnostic expertise and problem-solving capabilities.
Case Study 1: The “Phantom Obstruction”—Moisture Damage
Customer Problem: A homeowner in a coastal area reported intermittent garage door reversals that occurred exclusively after heavy rainstorms. The sensors appeared perfectly aligned with solid LED indicators. DIY troubleshooting (cleaning, alignment checks) produced no results. Smart Doors Diagnosis: Our technician noticed that the reversals occurred during door operation, not when the door was stationary. Upon closer inspection using a high-intensity flashlight, the receiver lens had developed microscopic internal condensation—moisture trapped between the lens layers that wasn’t visible under normal lighting conditions. While the IR beam was strong enough to keep the LED indicator lit when the door was stationary, the vibration from the garage door motor traveling through the mounting bracket caused the internal moisture to temporarily refract the IR beam at unpredictable angles. This created split-second beam interruptions that triggered false reversals. Solution: We replaced the sensor set with weather-sealed units rated for marine environments and elevated the mounting brackets by one inch to prevent standing water from reaching the sensor base. We also installed small drainage channels in the garage floor to direct water away from the door opening.
Case Study 2: Solar Oversaturation—The West-Facing Garage
Customer Problem: A suburban homeowner with a west-facing garage experienced reversals every evening between 4:00 PM and 6:00 PM during summer months. The door worked perfectly all morning and early afternoon. The sensors showed solid LEDs, and no obstructions were present. Smart Doors Diagnosis: Our technician visited during the problem hours and immediately identified the issue: the low angle of the setting sun created a direct line of sight to the receiver sensor. The intense ambient infrared radiation from the sun completely overwhelmed the receiver’s photodiode, making it impossible to detect the emitter’s specific frequency. The homeowner had tried creating a cardboard sunshade, but the sun’s angle changed throughout the summer season, making the shade ineffective after a few weeks. Solution: Rather than installing an adjustable shade or relocating the sensors to a different height, we swapped the emitter and receiver positions. By placing the receiver on the shaded (north-facing) side of the garage opening, it was completely protected from direct solar exposure regardless of the season. No new hardware was required—just 15 minutes of rewiring.
Smart Doors’ Maintenance Checklist: Prevent Sensor Problems Before They Start
Proactive maintenance prevents 60% of sensor-related service calls. By following this seasonal checklist, you’ll keep your garage door’s safety system functioning reliably year-round.
Quarterly Maintenance Tasks (Every 3 Months)
| Task | How to Perform | Why It Matters |
|---|---|---|
| Clean Sensor Lenses | Use a dry microfiber cloth to gently wipe both emitter and receiver lenses | Removes cobwebs, dust, and pollen that scatter the IR beam |
| Inspect Sensor Pathway | Walk the 6-inch zone and remove all debris and storage items | Prevents false reversals from physical obstructions |
| Test Alignment | Check LED indicators; adjust receiver bracket if flickering | Catches early misalignment before it causes failures |
| Verify Sensor Height | Measure to confirm both sensors remain at 6 inches above floor | Ensures compliance with safety standards and proper beam path |
Annual Deep Inspection (Once Per Year)
| Task | What to Look For | Action Required |
|---|---|---|
| Check Mounting Brackets | Rust, looseness, structural damage | Tighten screws; replace corroded brackets |
| Inspect Wiring | Frays, exposed copper, rodent damage, punctures | Call Smart Doors for professional wiring repair |
| Test in Direct Sunlight | Operate during sunrise/sunset in your garage orientation | Install sunshade or swap sensor positions if problems occur |
| Seal Garage Openings | Deteriorated weatherstripping, gaps in door seals | Replace weatherstripping to reduce moisture and dust |
When to Schedule Professional Service
Even with diligent DIY maintenance, certain situations warrant professional inspection:
- You notice any of the warning signs from the previous section (dead LEDs, intermittent failures after DIY fixes, visible corrosion)
- Your garage door system is 10+ years old—sensors, like all electronic components, have finite lifespans
- You’ve experienced a power surge or lightning strike near your home
- Your garage floods seasonally or has persistent moisture problems
Smart Doors Annual Maintenance Package
We offer comprehensive annual inspections that cover your entire garage door system—sensors, springs, tracks, rollers, cables, and motor. Our technicians catch small issues before they become expensive emergencies, extending the lifespan of your investment and ensuring your family’s safety.
Final Thoughts
A garage door that reverses isn’t broken—it’s a federally mandated safety feature protecting your family from entrapment injuries. Since 1993, photoelectric sensors have prevented thousands of injuries and deaths by creating an invisible safety barrier across your garage door opening. Many sensor issues—dirt, misalignment, sunlight interference, physical obstructions—are DIY-friendly when you understand the technology and follow systematic troubleshooting. By cleaning lenses, adjusting alignment, and creating sun shields, most homeowners can restore proper function without professional help. But when LEDs go dark, wiring shows damage, or moisture infiltrates the system, it’s time to call Smart Doors. Electrical failures, logic board malfunctions, and water damage require professional diagnostic tools and expertise to resolve safely. Attempting complex repairs yourself can result in electrical shock, further damage to your garage door system, or voiding manufacturer warranties. Since 1993, photoelectric sensors have served as silent guardians, working 24/7 to keep your family safe. By maintaining these critical components and knowing when to seek professional help, you ensure they’re ready to protect your loved ones when it matters most.
Tried Our Troubleshooting Steps and Still Stuck?
Get expert help from Smart Doors’ certified technicians. We’ll diagnose the problem, explain your options, and restore your garage door’s safety and functionality—fast.
Free diagnostic inspection • Same-day service available • 100% satisfaction guaranteed
References:
- U.S. Consumer Product Safety Commission (CPSC). (1992). Safety Standard for Automatic Garage Door Operators. 16 CFR Part 1211. https://www.cpsc.gov/s3fs-public/pdfs/blk_media_1211.pdf
- Family Handyman. (2023). How to Repair Garage Door Openers. https://www.familyhandyman.com/project/how-to-repair-garage-door-openers/
- Bob Vila. (2022). How to Fix Garage Door Sensors. https://www.bobvila.com/articles/garage-door-sensors/
- U.S. Consumer Product Safety Commission (CPSC). (2014). Non-Fire Carbon Monoxide Deaths Associated with Engine-Driven Tools and Garage Door Entrapments. National Electronic Injury Surveillance System (NEISS). https://www.cpsc.gov/Research–Statistics/Injury-Statistics
- This Old House. (2023). Garage Door Maintenance Tips. https://www.thisoldhouse.com/garages/21018931/how-to-maintain-a-garage-door
- Grand View Research. (2022). Smart Home Market Size, Share & Trends Analysis Report. https://www.grandviewresearch.com/industry-analysis/smart-home-market
- InspectAPedia. (2023). Garage Door Opener Safety Sensors: Photo Eye Installation, Troubleshooting, & Repair. https://inspectapedia.com/home_safety/Garage_Door_Safety_Sensors.php